

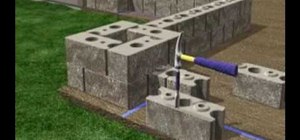
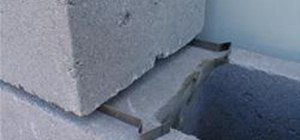
In this how to video, you will learn how to build a patio enclosure with seating walls. You will need measuring tape, a level, a dead blow hammer, a square, masking tape, safety glasses, and work gloves. You will need the courtyard collection as well. First, draw out a plan for the enclosure. Mark the locations of the posts and panels with tape. Openings should be three to four feet wide. Start building walls at posts. Adjustments must be made at corners. Start by placing four corner blocks. Make sure the long sides face out. Align them with a square. Shims can be used to level blocks. On the second course, place the second blocks so that they overlap two blocks underneath them. Begin the wall panel by splitting the split block. Place one half with the split side on the post. On the second course, split a split block and place the large piece against the post. Build the first two courses at the same time for proper alignment. To build a corner, split the large split block and place the large piece with the split side facing the corner. Place a corner block perpendicular to this piece. Place the corner block to face the opposite direction and place the remaining piece of the split block to finish the corner. Continue the wall to the next post. Build the next post repeating the steps mentioned. Continue to build the wall panel to the next most. Keep doing this until your patio enclosure is complete. Finish off the posts with cap blocks. Secure two in place on the post with masonry adhesive. For wall caps, begin capping at the corner. Rotate each cap to fit. Once they are in place, secure them with masonry adhesive. You have finished your patio enclosure.
Just updated your iPhone? You'll find new emoji, enhanced security, podcast transcripts, Apple Cash virtual numbers, and other useful features. There are even new additions hidden within Safari. Find out what's new and changed on your iPhone with the iOS 17.4 update.


Be the First to Comment
Share Your Thoughts