

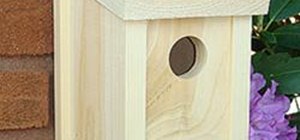
How to Build a Basic Birdhouse
Maybe you were outside in your back yard and you noticed that it seemed a little lonely and empty. Our maybe you have young kids that love to experience wild life in their own back yard. Whatever reason you have for searching out this article, you have decided to build your very own basic bird house.
I recently built a deck in my back and had alot of scrap 1x6 decking boards left over. Instead of letting all that good material go to waste, I decided to build a couple of birdhouses with what I had left over. I learned a lot of interesting techniques and shortcuts while building these birdhouses and now I'm going to share some of those with you.
Materials
Below is a list of materials that you will need to complete this project:
- 1 – 1" X 6" X 6'-0" Pressure Treated Lumber
- 28 – 2" Galvanized Screws (or nails)
- Miter Saw (optional)
- Circular Saw
- Screw Gun
- 1 1/2" Hole Cutting Drill Bit
- Hammer
- Tape measure
- Pencil
You can either build your bird house using 2" galvanized screws or 2" galvanized nails. I prefer to use screws because they go in easier and they won't back out on you. However, you may use which ever one you prefer.
You will need a circular saw to cut your long cuts and I also like to use a miter saw to cut the angles more accurately. However, you can complete the bird house with just a circular saw.
Now that we have all our materials…let's get started building our birdhouse.
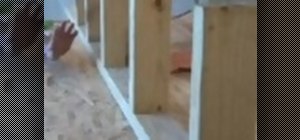
Step 1 Cutting the Side Pieces
The first thing we will want to do is cut two 12" long pieces off of our board. It is very important that these two pieces be the exact same size.
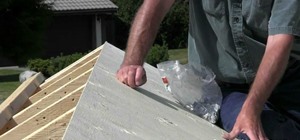
We will now mark a 45 degree cut from the top corner to the other side on each board as illustrated in our illustration below.
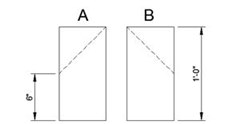
Make sure that you always have your best looking side facing to the outside before you make any kind of cut. You always want your outside looking best because that is the side that everyone will see.
Go ahead and make the cuts on the 45 degree lines that you made and this will give us our two side pieces.
Step 2 Cutting Our Front Piece
Tips
- I always like to go ahead and cut all my pieces before I start to assemble them. It makes it a whole lot easier.
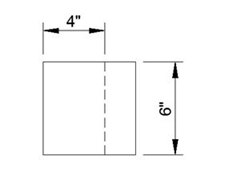
Cut a 6" piece of wood from your 6' board. This will give you a 6" x 6" piece of wood.
You will now need to mark and cut 2" off one side of the board so you will have a 4"x6" piece of wood (as shown below).
Whether you are a human or a bird, a house isn't much use if you can't get in and out of it. So now we will need to cut a 1 1/2"Ø hole using a hole cutting bit.
You will won't to mark a center point in the center of your wood and 2" down from the top (as shown below).
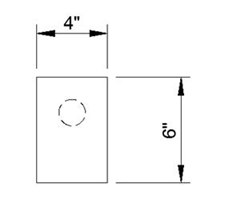
Now take your hole cutting bit and cut a hole for the entrance to your bird house.
You now have the front part of your bird house cut out and ready to go.
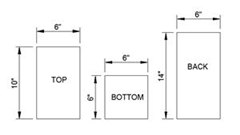
Step 3 Cutting the Top, Bottom, and Back Pieces
I have combined the three last cuts due to their simple nature.
For the top piece, you will want to cut a board that is 10" long. You shouldn't have to cut it as far as the width is concerned.
For the bottom piece, you will want to cut a board that is 6" long. You shouldn't have to cut it as far as the width is concerned. This should give you 6"x6" square board.
For the back piece, you will want to cut a board that is 14" long. You shouldn't have to cut it as far as the width is concerned.
We now have all our pieces cut and ready for assembly. Let's start pieceing the puzzle together.
Step 4 Labeling the Pieces
I went ahead and labeled all our pieces just for clarification's sake. Here is how the piece's will be labeled:
- A = Left Side Piece
- B = Right Side Piece
- C = Top
- D = Bottom
- E = Front
- F = Back
Step 5 Connecting the Front, Sides, and Bottom Pieces
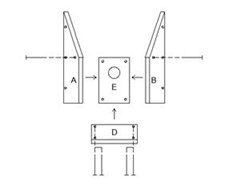
First thing we want to do is connect the two side pieces "A" & "B" with the Bottom piece "D". As the illustration above shows, insert a screw into all four corners of the bottom piece "D" securing it to the two side pieces.
Now you will want to insert two screws through the two side pieces and into the top part of the Front piece "E". Do not insert screws into the bottom of the front piece. This will allow the Front piece "E" to swing open for cleaning access later.
Now you should have the two sides pieces, Bottom, and Front Pieces connected together.
Step 6 Connecting the Back Piece "F"
Now we want to connect the back piece to our bird house. As the figure below shows, make sure the bottom of the back piece is flush with the bottom piece.
When you get the pieces flush then go ahead and put a screw in it to hold it in place while you put the rest of the screw in the back.

You should have 3 screws on each side of the Back Piece securing it to the two side pieces.
Step 7 Connecting the Top and Final Piece
There is two things to remember when connecting the Top piece to your newly constructed bird house. Make sure it's flush with the two sides and make sure there is no gap between the Top and Back pieces.
You don't want a leaky roof on your house and neither do the birds.
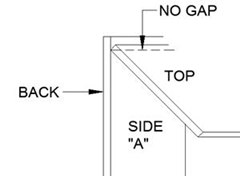
If you wanted to get fancy and ensure that there is no leaks then you could cut an angle on the edge so that the top piece fits snuggly against the Back piece. Its up to you how fancy you want to get.
Conclusion
You have completed your birdhouse. All thats left is any cosmetic finishes that you want to add to it. I hope you found this article helpful and goo luck with your bird house.
Warnings
- Some birds do not like painted structures and may refuse to nest in your bird house if it is painted.
- I would recommend hanging the bird house no lower than 12' off the ground.
Just updated your iPhone? You'll find new emoji, enhanced security, podcast transcripts, Apple Cash virtual numbers, and other useful features. There are even new additions hidden within Safari. Find out what's new and changed on your iPhone with the iOS 17.4 update.


Be the First to Comment
Share Your Thoughts